A little while ago a good friend of mine (who also happens to be an amazing photographer) came up with the idea that we should do a fashion shoot together. I would style, do the hair and makeup and she would make some magic with her camera. You’re probably thinking, “what a wonderful idea!”. You would be right. She let me have control of the styling and themes and gave me the general idea of the feeling she wanted. It’s a good thing we work so well together. We found the perfect model and after several weeks of planning and seven hours later on the day of the shoot, managed to wrap up a photo shoot with three different themes. I wanted to explain the styling, makeup and hair for each theme a little more in depth, so I’m going to write about this in three parts. The first that I’ll be sharing with you is our take on glam.
Glam Styling
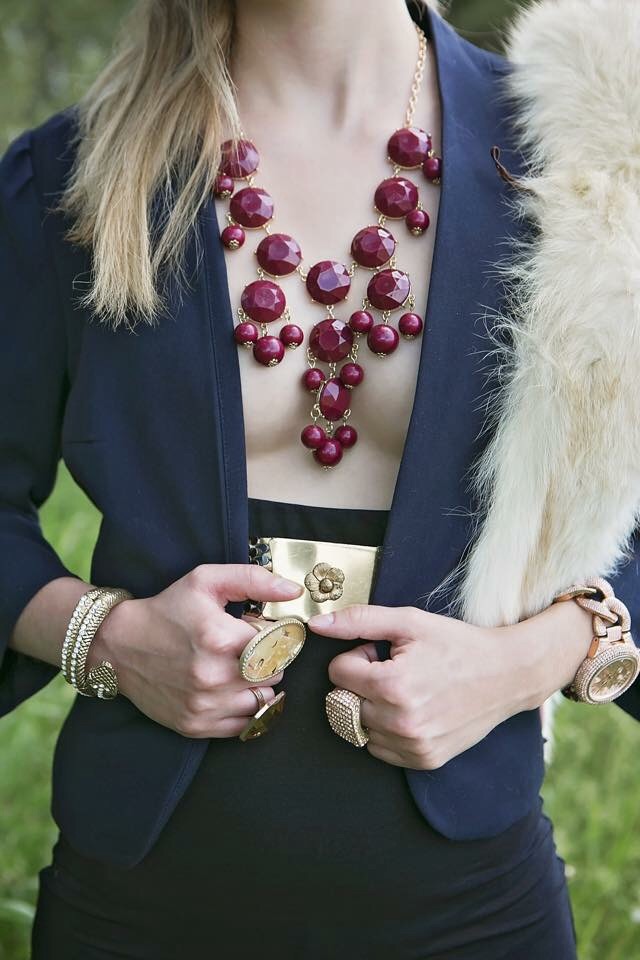

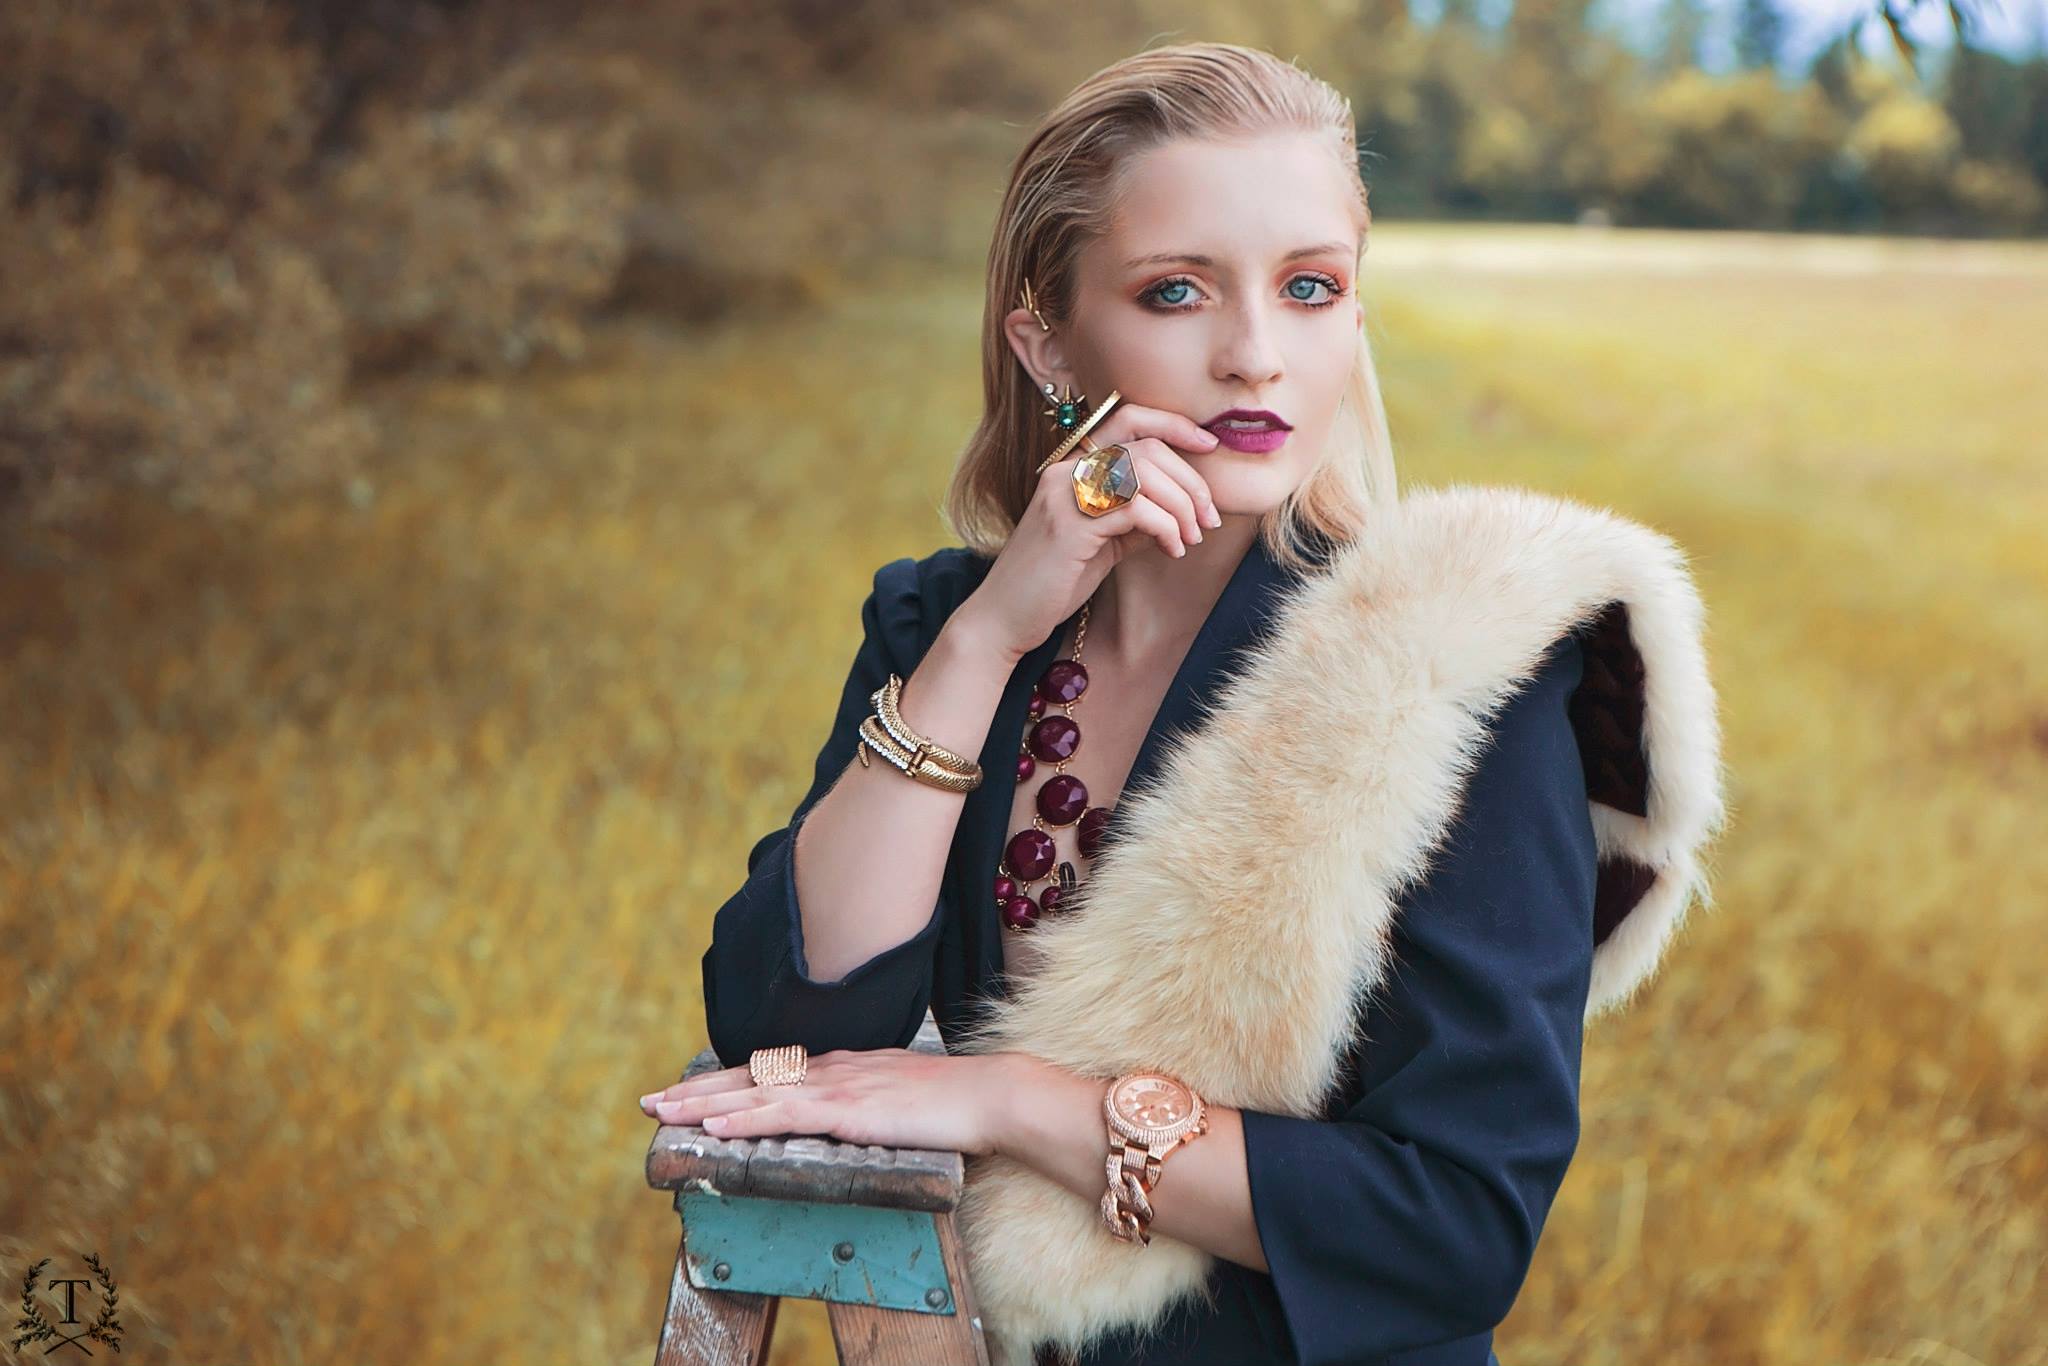
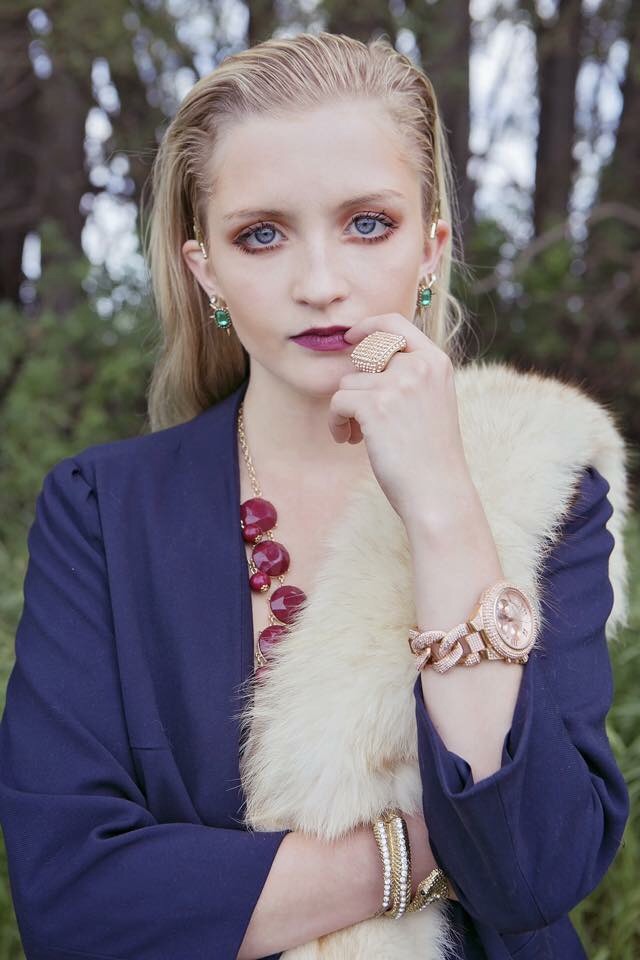
This idea came to me pretty quickly. I love the idea of showing a little bit of skin while having some structure in your clothing. Plus, when you add a bunch of accessories, you don’t even notice whatever nudity that there may be. I started the whole process with realizing that I didn’t want her to have a top on. I wanted the chest to be open. So, to balance that, I found a structured jacket that was medium in length with long sleeves in a beautiful navy blue. I paired that with high waisted black very short shorts (actually, they were for wearing under a dress, but that’s our secret). That left only a small amount of chest showing and a lot of leg, which would draw the eyes down. With that, the basic layers were done. Next it was on to the accessories. Keep in mind that the only closet that I had to pull from was my own. It’s a good thing that I collect accessories. Knowing that I wanted her to look powerful and have her hair slicked back (this was also chosen because I can’t do hair and it was easy) I used two spiky ear cuffs that sat around the tops of her ears. I then added a pair of spiked emerald earrings to wear on her actual earlobes. Then, a burgundy and gold statement necklace was added that was the exact color as the suede heels I put her in. A gold belt, gold snake bracelet with diamonds, rose gold diamond link Michael Kors watch, extra large opal ring, extra large deep yellow gemstone ring and rose gold multi diamond ring finished the look. By the way, when I say “diamonds” I mean fiamonds. Aka fake diamonds. I’m not just rolling around in real diamonds over here. Fake all the way. For a little bit of luxury, the last step was placing a piece of vintage 1970’s fur on her shoulder. If that’s not glam, then I don’t know what is.
Hair
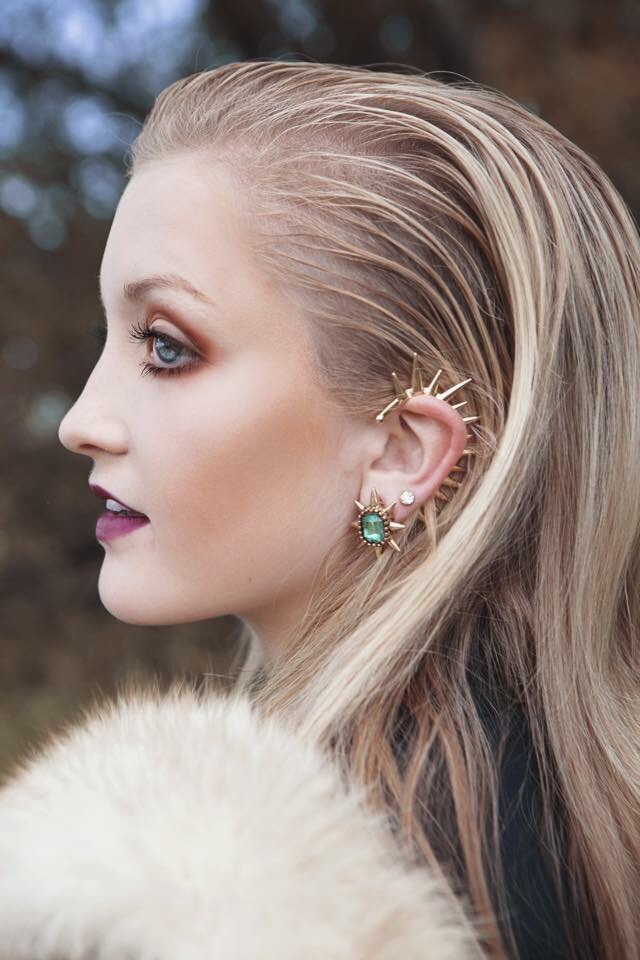
Like I said earlier, I don’t do hair. I barely do my own damn hair. Knowing that we had to change three looks in a day meant that I had to find something I could do and undo very easily. Since she had a whole power glam look going, I thought, what if we slicked her hair back? We needed something off of her face so that we could see the ear cuffs and earrings she was wearing anyway. So I sprayed beach spray into her hair and brushed the sides back. I used beach spray instead of hairspray because I knew that it would brush out a lot easier. Voila! It worked! Well, it could have been a lot worse lol.
Makeup
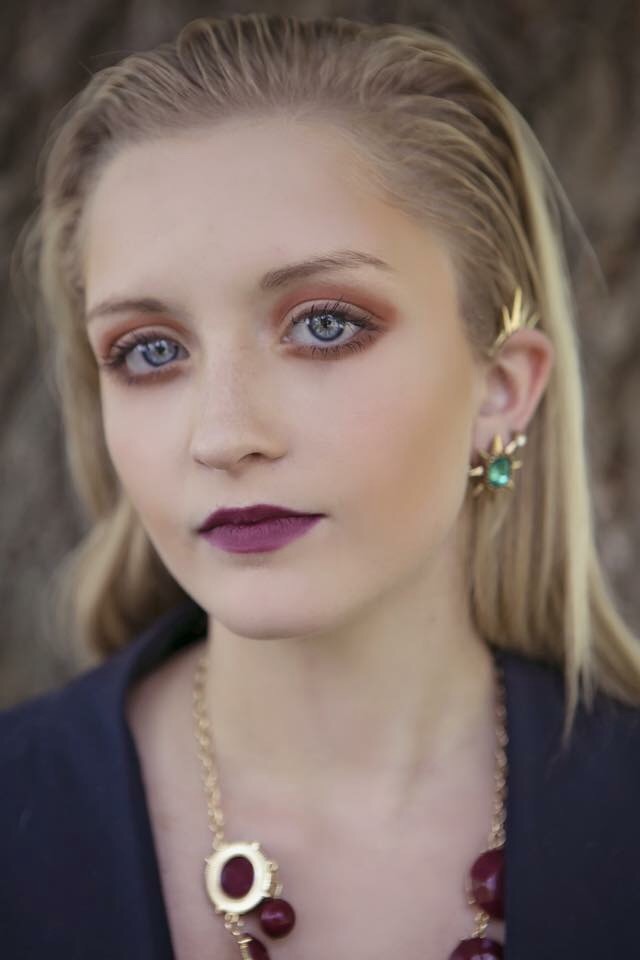
Ok. Makeup is what I do. I’ve done it for a long time and except for a couple of opinions, I’m not too shabby at it. This would be the easiest part of my day. I applied a foundation all over her face and finished with photo ready pressed powder to take down any shine. Then, I applied a bronzer on her eyelids and under her cheekbones (remember to blend, blend, blend ladies!). In the creases of the eyes and under the bottom lash line, I used a brownish red eyeshadow. A tiny bit of black eyeliner on the top eyelids only and tons of black mascara on both top and bottom lashes are where the real impact for the eyes came from. Some white high lighter under the eyebrows and along the tops of the cheekbones gave just the right amount of lift so that it didn’t look too matte. Finally, we took a lip liner the exact shade as her necklace and shoes and filled her lips in with no gloss or lipstick on top. I think that the results were exactly what we were looking for, and more importantly, photographed really well.
I would love to tell you about the photo process, but that was left all up to the photographer. I hope that you enjoyed hearing about the process for this look and that you try a couple of the elements at home on yourself. The next look that I’ll be going over will be the romantic look that we did. Thank you to Katie Bertholet for being such a great model, not complaining once and for allowing us to put you in things that may not have been your taste. You were great Katie. We have the pictures to prove it! Also, thank you to Thera Weenink from Thera’s Photography for involving me. You always do such great work and it was fun to work on this project with you. If anyone wants to check out more photos of the shoot we did, her work in general, or to book with her, you can find her here:
Facebook: Thera’s Photography
Instagram: @therasphotography
Email: thera_weenink@hotmail.com


Leave A Comment